With Jira there are tons of ways to extract reporting data you need. From the project reports, to the built in dashboard functionality and all the way to addons like EasyBI, there are many paths to getting metrics you need for your and your team. However, there's always room for more ways to skin that informational feline.
In today's blog post, I will quickly expose you to how you can use Python and Jupyter notebooks to extract information from Jira in an implementation agnostic (server, data center and cloud) manner.
What do you need to get going?
The list of prerequisites you need to complete this task:
- Docker or Docker CE for Mac, Windows or Linux: https://www.docker.com/get-started
- A Docker Hub account (I believe this is now required to download Docker for Mac or Windows)
That's it!
How to get going with Jupyter Notebooks?
There are TONS of great web pages and Youtube videos on Juypter Notebook basics, so I encourage everyone to Google around.
For our purposes, all you need to do is fire up a Docker image and your web brower.
Just enter the following on the command line:
root@gdaymate4:/home/mmarch/jirabook# docker run --rm -p 10000:8888 -e JUPYTER_ENABLE_LAB=yes -v "$PWD":/home/jovyan jupyter/scipy-notebook
... and then connect to the URL that is sent to the command console.
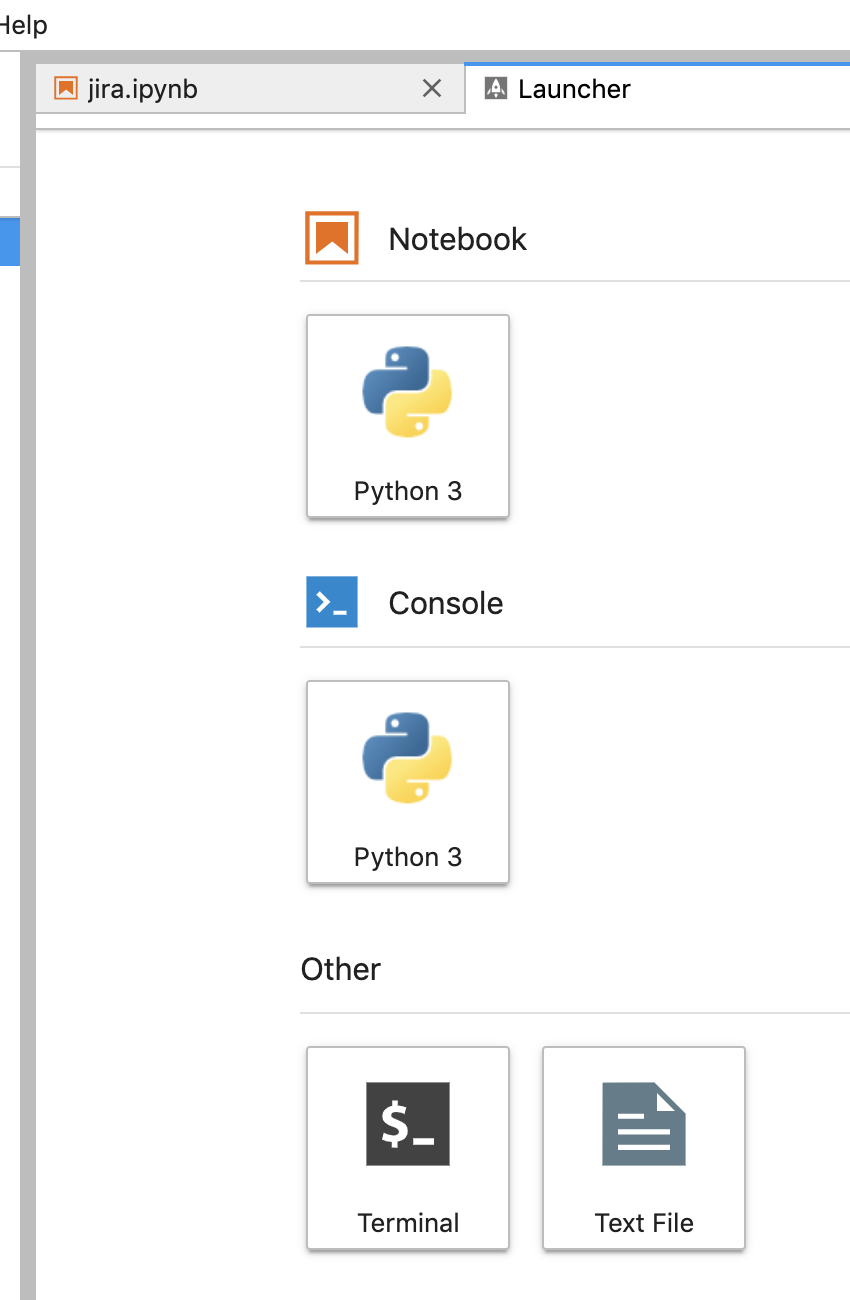
When you login you'll see these options:

Make sure you select the Python 3 Notebook option.
Let's start note-booking!
First, lets install the Jira module. On the Jupyter platform, you click in the first cell and run shell commands by putting an "!" in front of the command:
!pip install jira
Requirement already satisfied: jira in /opt/conda/lib/python3.7/site-packages (2.0.0)
Requirement already satisfied: pbr>=3.0.0 in /opt/conda/lib/python3.7/site-packages (from jira) (5.1.3)
Requirement already satisfied: requests-oauthlib>=0.6.1 in /opt/conda/lib/python3.7/site-packages (from jira) (1.2.0)
Requirement already satisfied: defusedxml in /opt/conda/lib/python3.7/site-packages (from jira) (0.5.0)
Requirement already satisfied: requests>=2.10.0 in /opt/conda/lib/python3.7/site-packages (from jira) (2.21.0)
Requirement already satisfied: oauthlib[signedtoken]>=1.0.0 in /opt/conda/lib/python3.7/site-packages (from jira) (3.0.1)
Requirement already satisfied: six>=1.10.0 in /opt/conda/lib/python3.7/site-packages (from jira) (1.12.0)
Requirement already satisfied: requests-toolbelt in /opt/conda/lib/python3.7/site-packages (from jira) (0.9.1)
Requirement already satisfied: setuptools>=20.10.1 in /opt/conda/lib/python3.7/site-packages (from jira) (40.8.0)
Requirement already satisfied: urllib3<1.25,>=1.21.1 in /opt/conda/lib/python3.7/site-packages (from requests>=2.10.0->jira) (1.24.1)
Requirement already satisfied: chardet<3.1.0,>=3.0.2 in /opt/conda/lib/python3.7/site-packages (from requests>=2.10.0->jira) (3.0.4)
Requirement already satisfied: certifi>=2017.4.17 in /opt/conda/lib/python3.7/site-packages (from requests>=2.10.0->jira) (2019.3.9)
Requirement already satisfied: idna<2.9,>=2.5 in /opt/conda/lib/python3.7/site-packages (from requests>=2.10.0->jira) (2.8)
Requirement already satisfied: cryptography; extra == "signedtoken" in /opt/conda/lib/python3.7/site-packages (from oauthlib[signedtoken]>=1.0.0->jira) (2.6.1)
Requirement already satisfied: pyjwt>=1.0.0; extra == "signedtoken" in /opt/conda/lib/python3.7/site-packages (from oauthlib[signedtoken]>=1.0.0->jira) (1.7.1)
Requirement already satisfied: asn1crypto>=0.21.0 in /opt/conda/lib/python3.7/site-packages (from cryptography; extra == "signedtoken"->oauthlib[signedtoken]>=1.0.0->jira) (0.24.0)
Requirement already satisfied: cffi!=1.11.3,>=1.8 in /opt/conda/lib/python3.7/site-packages (from cryptography; extra == "signedtoken"->oauthlib[signedtoken]>=1.0.0->jira) (1.12.2)
Requirement already satisfied: pycparser in /opt/conda/lib/python3.7/site-packages (from cffi!=1.11.3,>=1.8->cryptography; extra == "signedtoken"->oauthlib[signedtoken]>=1.0.0->jira) (2.19)
Next import all your modules you want to use:
from jira import JIRA
import getpass
import json
import pandas as pd
Next import your endpoint and user ID.
host = "http://jira.teamsinspace.com:8080"
uid = "mdavis"one
Grab the password to your Jira account:
pswd = getpass.getpass('Password:')
Password: ········
Connect to JIRA.
jira=JIRA(server=host, basic_auth=(uid, pswd))
Grab and print all the projects.
projects = jira.projects()
projectgrid = list()
projectlist=list()
for project in projects:
   projectlist.append(project.key)

print (projectlist)
['ADR', 'CS', 'DMS', 'EO', 'FWS', 'FIN', 'FME', 'HCT', 'HR', 'ICM', 'IOS', 'ITOPS', 'ITS', 'LEGT', 'MB', 'MAC', 'OA', 'PERF', 'PLAT', 'PM', 'SOPS', 'WEB', 'TIS', 'TRS', 'TSD']
Set variables and pulling time intervals.
total_days = 360
day_interval = 30
issue_table = list()
issue_table_header = list()
Grab all the issue / project counts for each month over a year.
for project in projectlist:
   print ("PROJ: ", project)
   issue_table_row = list()
   issue_table_row.append(project)
   issue_table_header = list()
   issue_table_header.append("Days")
   for date_range in range(0,total_days,day_interval):
      if date_range == 0:
         continue
      issues = jira.search_issues('project = "' + project + '" and created < -' + str(date_range - day_interval) + 'd and created >= -' + str(date_range)+ 'd ORDER BY key DESC, updated DESC', maxResults=0,startAt=0,json_result=True)
      issue_table_row.append(issues['total'])
      issue_table_header.append(date_range)
   issue_table.append(issue_table_row)
Debug output:
PROJ: ADR
PROJ: CS
PROJ: DMS
PROJ: EO
PROJ: FWS
PROJ: FIN
PROJ: FME
PROJ: HCT
PROJ: HR
PROJ: ICM
>PROJ: IOS
PROJ: ITOPS
PROJ: ITS
>PROJ: LEGT
PROJ: MB
PROJ: MAC
PROJ: OA
PROJ: PERF
PROJ: PLAT
PROJ: PM
PROJ: SOPS
PROJ: WEB
PROJ: TIS
PROJ: TRS
PROJ: TSD
Set up data in Pandas.
import pandas as pd
df = pd.DataFrame(issue_table)
df.columns = issue_table_header
Dump data to a grid. Here's the output of all projects that have created issues for the year in grid form:
| Days | 30 | 60 | 90 | 120 | 150 | 180 | 210 | 240 | 270 | 300 | 330 | |
| 0 | ADR | 0 | 0 | 0 | 20 | 0 | 0 | 0 | 0 | 0 | 0 | 0 |
| 1 | CS | 0 | 0 | 0 | 21 | 0 | 0 | 0 | 0 | 0 | 0 | 0 |
| 2 | DMS | 0 | 0 | 1 | 0 | 0 | 0 | 0 | 0 | 0 | 0 | 0 |
| 3 | EO | 0 | 0 | 0 | 12 | 0 | 0 | 0 | 0 | 0 | 0 | 0 |
| 4 | FWS | 0 | 3 | 30 | 0 | 0 | 0 | 0 | 0 | 0 | 0 | 0 |
| 5 | FME | 0 | 0 | 0 | 2 | 0 | 0 | 0 | 0 | 0 | 0 | 0 |
| 6 | HCT | 0 | 0 | 0 | 15 | 0 | 0 | 0 | 0 | 0 | 0 | 0 |
| 7 | HR | 0 | 0 | 0 | 1 | 0 | 0 | 0 | 0 | 0 | 0 | 0 |
| 8 | ICM | 1 | 0 | 4 | 8 | 0 | 0 | 0 | 0 | 0 | 0 | 0 |
| 9 | IOS | 0 | 0 | 0 | 22 | 0 | 0 | 0 | 0 | 0 | 0 | 0 |
| 10 | ITOPS | 8 | 3 | 7 | 1 | 0 | 0 | 0 | 0 | 0 | 0 | 0 |
| 11 | ITS | 3 | 4 | 69 | 52 | 0 | 0 | 0 | 0 | 0 | 0 | 0 |
| 12 | LEGT | 0 | 0 | 0 | 1 | 0 | 0 | 0 | 0 | 0 | 0 | 0 |
| 13 | MB | 0 | 0 | 0 | 9 | 0 | 0 | 0 | 0 | 0 | 0 | 0 |
| 14 | MAC | 0 | 0 | 0 | 15 | 0 | 0 | 0 | 0 | 0 | 0 | 0 |
| 15 | OA | 0 | 0 | 0 | 1 | 0 | 0 | 0 | 0 | 0 | 0 | 0 |
| 16 | PERF | 0 | 0 | 0 | 4 | 0 | 0 | 0 | 0 | 0 | 0 | 0 |
| 17 | PLAT | 0 | 0 | 0 | 11 | 0 | 0 | 0 | 0 | 0 | 0 | 0 |
| 18 | PM | 0 | 0 | 0 | 8 | 0 | 0 | 0 | 0 | 0 | 0 | 0 |
| 19 | SOPS | 0 | 0 | 1 | 0 | 0 | 0 | 0 | 0 | 0 | 0 | 0 |
| 20 | WEB | 0 | 0 | 0 | 13 | 0 | 0 | 0 | 0 | 0 | 0 | 0 |
| 21 | TIS | 3 | 1 | 4 | 57 | 3 | 8 | 54 | 0 | 0 | 0 | 0 |
| 22 | TRS | 8 | 29 | 0 | 0 | 0 | 0 | 0 | 0 | 0 | 0 | 0 |
| 23 | TSD | 0 | 0 | 0 | 1 | 0 | 0 | 0 | 0 | 0 | 0 | 0 |
Wrap up
Now you should be able to pull data and show table formatted output from Jira using Jupyter Notebooks. In a future blog, we'll show the ease in which you can visualize your Jira data.
Sign up to receive more great content
Learn more about Atlassian and how Isos can help by signing up to receive our latest blogs, eBooks, whitepapers and more.


